Packet Spots
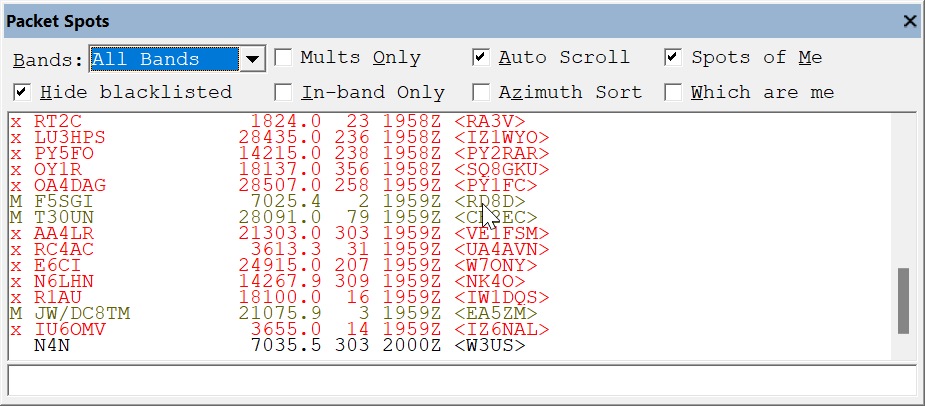
New multipliers will show up on different frequencies in the Packet Spots window if allowed. The window looks like this:
Operation
Note the conventions of the window:
The 'M' means that this station would be a multiplier in the ham radio contest.
No prefix to the call is a non-multiplier station. In this box, N4N.
An 'X' means that the spot is 'out of band' as determined by
the type of contest you are in. The one shown is a CW contest, so all the red calls are in the phone or non-contest bands (WARC).
the settings you have set up in the 'Edit sub-bands' program found under 'Start|WriteLog v12|Edit sub bands.' You would do this, say, if you had a General license in the United States and wanted to stay in the General portions of the bands during the contest.
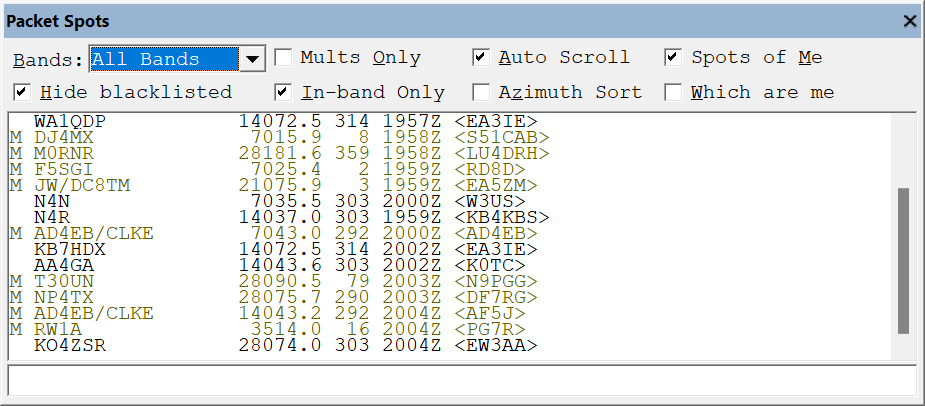
By clicking on the 'In-band Only' check box as shown in the illustration, these out-of-band ham radio contacts won't be displayed in the packet box.
When a multiplier shows up, you need to make a choice: ignore the multiplier for many good reasons (it's early and I'll work that common multiplier sometime during the contest), or change frequencies to try and work the multiplier (how many long path openings to Africa will I get during this contest to work this rare one???) and risk losing your run frequency.
If you decide that trying to work T30UN is worth it and you have an RS-232 / USB controlled radio, double click on the T30UN call in the Packet Spots window. This will place T30UN in the QSO Entry window and change your radio frequency to the packet frequency provided.
If you are fortunate to have quickly worked this station and want to quickly return to your run frequency, hit the F12 function key to return to your previous frequency.
You can do this with new stations, not just multipliers. While calling CQ, it's possible to work new stations that show up in the Packet Spots window and go back to your run frequency and continue to call CQ. It keeps your rate up in slower times.
Pressing Control-T brings up a fully editable packet spot window taking the frequency of your ham radio if RS-232 / USB controlled, the call sign in the QSO Entry window or last log entry, split information with QSX if appropriate, and the ability to place a comment on the screen. Once completed, pressing Enter will send your packet spot on it's way.
Packet Setup
There are two windows that need to be opened in order to effectively use packet. They are the 'Packet Window' which establishes the external packet connection, and, the 'Packet Spots' window (above) which shows only the call signs defined by the operator.
Packet Window
In order to open the packet window and establish the packet connection, go to the toolbar and click on 'Window.' Then place a check mark by the 'Packet Window' selection. This will open a new packet window. Here's how the packet window looks:
Using a Telnet, TNC or RF to connect
To establish a connection with a TNC, select the TNC COM port. This COM port should match the settings and speed of the TNC and the settings for the COM port in the WriteLog.ini file. If they don't, your packet connection won't work.
Once connected, the packet cluster will prompt you for your call sign and, perhaps, a password. With the Packet Window in focus, simply start to enter your ham radio call sign. A separate quick window opens for you automatically to type in your information. When you press 'Enter' on the keyboard, the window closes and the information you placed in the window is sent on its way.
Using a Telnet connection
Clicking on the 'Telnet' selection brings up a new window that asks for the IP / Name and port to use to connect. Enter the IP name or address for the telnet connection. In my window above, it is KN2M.D2G.COM and the port number is 7373. A decent selection of Packet Clusters around the world can be found by clicking on the link.
Once connected, a prompt will ask you for your call sign and password. With the Packet Window selected as the main window, simply start to enter your call sign and you will see a separate quick window open for you to type in your information. When you press 'Enter' on the keyboard, the window closes and the information you placed in the window is sent on its way.
Using a local server connection
If your TNC is located on a networked computer (such as in a multi-op situation), you should select 'Local Network' as your option. Enter the name of the networked machine that has the telnet or RF connection. The program will now go looking for the packet connection through the network.
A successful result of connecting to the local or external packet network will produce the packet terminal window, a running show of ham radio spots coming from the cluster.
Packet Spots Window
The Packet Spots Window is opened from the toolbar using the 'Window' selection and then checking the 'Packet Spots' selection from the drop-down menu. Again, the Packet Spots window looks like this:
Place the window where you want it on your screen. During the contest, this window provides the filtered calls from the Packet Terminal Window. The drop-down menu associated with the current 'All Bands' selection offers all the separate bands of the contest as well as a 'follow me' selection. When you change the band on your radio, the radio control function automatically switches your packet selection to match your radio.
Checking the 'Mult's Only' box will eliminate new calls available to work and narrow the focus to only new multipliers to work on the bands you have selected.
The 'In-band Contacts' will only show ham radio stations or multipliers that are within the band parameters you established in 'Edit Sub-bands' which can be found on the main program options within the Windows 'Start|Programs|WriteLog' location or based on the contest type (e.g., a CW contest won’t show the phone bands).
The 'Auto Scroll' function forces the most recent spots to be at the top of the screen.
Note: if you want to change the default font in this window to a Slash Zero font, you will need to edit the WriteLog.ini file. Open the file, find the [Correl] section of the file. The following entries control the font for this window, the Check Call Window, and the Net Gab Window:
FaceName=OCR-AFontHeight=-13FontWeight=400FontFamily=49To get the Slashed Zero font, change the OCR-A to "FixedSys" or add the entire line if it is not in the [Correl] section: FaceName=FixedSys