Setup - WriteLog Options
This will be a long section: it is about your radio, computer ports and WriteLog options. These parameters are different for every radio and can be highly frustrating when initially trying to get WriteLog working. Let's see if I can break this down a bit for you before looking at the screens.
This section assumes you will be setting up your radio with your computer through a USB port, not a physical RS-232 cable. Whether you use WriteLog with your computer with just a single comm port and USB cable from the computer to the radio, or you use an external CW keyer, or you have a multi-function external sound card, you will need to:
Set up your comm ports on your PC and radio
Once that is completed, you will need to tell WriteLog what sound card you are using (PC or your external device)
Then set up your Sound Card parameters on your PC.
In this section, we'll cover:
WriteLog Radio Settings - Settings for different radios and interfaces for reference
Great Circle Setting (to tell WriteLog where you are)
WriteLog Radio Settings - Examples of WriteLog settings for different radios
Ports
This discussion assumes you are using virtual serial ports, not physical RS-232 cables. The screens shown are from a Windows 11 PC.
I'm also going to use my Icom 7300 radio as the example here. I am also using a RigExpert 5000 as the interface between the radio and the computer, not just a straight computer -> Radio USB cable. Other radio manufacturers are on a separate page under this heading.
Note: You can also connect your computer to your Icom 7300 radio with just a USB cable. Be sure that you first download and install the Icom USB driver before connecting your 7300 (and other Icom radios) to the Windows computer the very first time from the Icom website. Windows will try to auto-install its own driver if you simply plugin the USB cable from the 7300 to the computer, and that one doesn’t work with the Icom USB interface. In my case, when I did this, it created a Comm Port 3.
Your Radio
Your radio has settings that need to be matched up with your computer's serial ports and WriteLog's set up options.
While there may be others, the two primary ones are:
The baud rate of the radio
The type of keyer (this one drove me crazy for a week)
There is an assumption that the 'default' rate of your radio will match the 'default' rate of your computer serial port that will match the 'default' rate of WriteLog's options. You can already see the problem here. Your objective is to ensure these 'default' rates actually match in your set up.
And note: I've had everything set to 115200 and it did not work. Everything set to 115000 and only 19200 worked. The USB driver set to 19200 and 115200 worked. It's like there is no consistency. So, try the 19,200 across the USB port (or leave it at the speed it was installed) and the radio and WriteLog and take it from that starting point. Best to change the speed on WriteLog until it sees the radio.
When you have the correct port set for the radio, but the baud rate is not set correctly, your QSO Entry Window will look like this - my baud rate in the drop-down window was at 115200:

In my case, changing it to the correct speed of 19200, the same QSO entry looks like this when it controls the radio:

(And 21441 is for phone, not CW, but that is the mode my radio was set at the time...)
The rate for the serial port is somewhere in your menu options for the radio. I have my entire setup for the Icom 7300 done with a 19200 baud rate. On the Icom 7300, the baud rate is set in the:
Menu|Connectors|CI-V|CI-V Baud Rate.
Note: there is a different CI-V Baud Rate that needs to be set at 115200 for the waterfall screen to work. And I've had it work with both of them set to AUTO. There doesn't seem to be rhyme or reason.
For CW, my Icom 7300 has a Menu|Keyer option that needs to be set. I don't know about other radios, but on the Icom, it's buried 5 levels in:
Menu|Keyer|Edit/Set|CW-Key Set|Key Type (Straight)
NOTE: You must have the radio in CW mode for the Keyer Menu option to appear.
Intuitive, right?
The net of it, the Icom 7300 default for your keyer type is that it is a paddle - a reasonable assumption - but WriteLog needs to have it set up as a Straight key. If not, all you get are Dits out of the radio. 5NN translates to 5II on CW if this is not set properly.
Which also means that if you are not contesting, you then need to go back to the Keyer menu and change it back to Paddle if you do CW with one.
Computer ports
The next area to look at is your computer's serial ports to ensure the 'default' baud rate is set; in my case, to 19200 baud.
On Windows 10/11, the way to find your serial ports is to access them from the Device Manager. To get there, in the lower left corner, click on the magnifying glass / Search and at the bottom of the screen, search for 'Device Manager'. Once you do, this will also show up in 'Recents' if you go back there.
Clicking on 'Device Manager' yields the following screen:

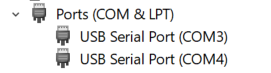
Click on the little carrot there and see what comm ports are configured on your computer:

Finally, to look at or set the baud rate, right click on one of the ports and select 'Properties'. Doing so and clicking on the Port Settings tab gets you to the baud rate. As noted, all of my setup is set at 19200. Do this for each of your serial ports.

WriteLog Options
In this section of the web site, I'm going to look at two of the Setup options: Ports and Sound Card Settings.
To access these, find Setup on the WriteLog menu bar, then click on 'WriteLog Options' from the drop-down menu, and then select the 'Ports' tab. What you will get is the following screen (mine is filled in, the first time you open it, it will be blank):
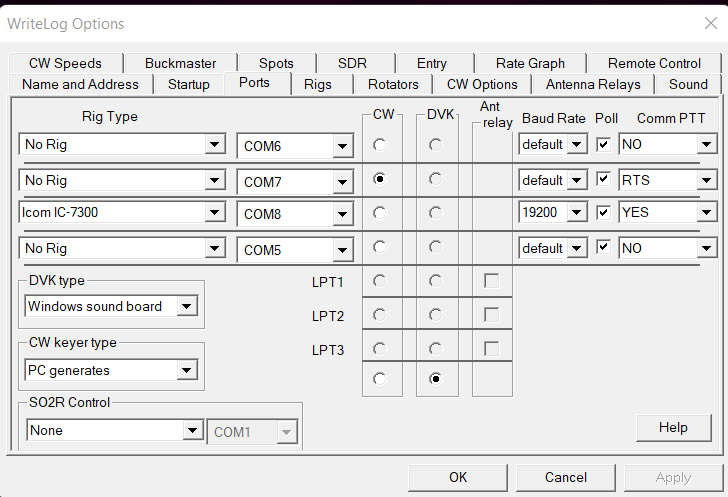
There is a lot to unpack here. First, the Fields:
Your radio and Comm port. This is used by WriteLog to control your rig. With rig control, for example, you can click on a packet spot and WriteLog will automatically move your ham radio to the frequency specified in the packet spot. In my case, I have an Icom 7300 connected on Comm 8. So, the rig is selected by the drop-down menu, the baud rate is auto (the pull-down selection can pull specific baud rates), we want that Comm port polled (so the frequency and other features work with the PC), and we're saying that PTT can be done on this port as well. You will need to check your ham radio's serial port connection in your ham radio manual to make sure the speeds match.
Your method of sending CW and Comm Port. In my case, I have the PC be the keyer for the CW. CW (and RTTY) is sent on a different comm port from your radio, so you will need a minimum of 2 comm ports to operate CW. Your external keyers will usually set up a comm port for you and you can select that comm port. Check your correct port on the radio button in the first column for CW (the screen shot above shows Port 7) and highlight something out of the 'CW keyer type' to match your equipment. If you never CW Contest, click the little white circle just above the check mark for "All Mode PTT on CW port RTS."
Your DVK type. I utilize the sound board from the computer and Wave files for sending voice messages. If you have a different type of interface, check which applies for you. If you have an external device with a sound card on it (RIGblaster, RigExpert, for example), you still check PC sends and that gets picked up by your external sound card and sends. If you never do SSB Contesting, select "None."
Your rotor controls are also controlled from COM ports. Select your rotor and com port from the drop down selections.
There are other fields here, of course. These, however, will get you set up and working as a single operator contester. Once selected, click OK. Then test the settings with your radio to ensure it is working.
Note: once this dialog is closed, again select 'Setup' from the tool bar and select 'Save Configuration'. Not doing so will revert back to whatever and you'll wonder how it changed.
Sound Card Setup
Whether you use an external sound card (RIGblaster, RigExpert) or just USB plugged into your radio, you will need to go to the Sound section of your Windows PC and set up the parameters there.
Computer Setup
Again, there are computer settings to set for a computer sound card used with WriteLog. And there are some WriteLog settings as well. First, we'll look at the computer.
From the Start Menu, select 'Settings'. And from 'Settings', select 'System' and 'Sound'.

Basically, you need to select your output and your input. Since I'm using a RigExpert in this example, the drop-down menu shows this option, and I selected it. If you have a single USB cable connecting your computer to your radio, USB will show up and you can select that.
Now that the computer knows where to send and listen for stuff, we can turn our attention to WriteLog.
WriteLog Sound Card
With WriteLog Sound Card setup on the ‘Sound’ tab, you need to identify the sound card and where your digital voice recordings are located on your computer so WriteLog can find them. Plus, there are important other settings to look at in this dialog box.

Several options appear here:
Enable RX Audio Processing. Check this to enable the sound card to send and receive signals.
Echo Microphone. Check this in SSB contests to enable the sound card to send WAV files from function keys. Using WriteLog in RTTY mode automatically disables this feature.
Pause recording loop during SSB Wave Xmit. If your sound board does not support simultaneous playback and record (duplex), then you need to check the button on for SSB operation. If you do a Setup|Save Configuration after setting this button, then this option will automatically be checked every time WriteLog starts. If you set this button off and your sound board doesn't support duplex, then you will get an error message whenever you try to transmit a WAV file in the SSB mode.
Enable Continuously Record. Turning on this menu selection causes WriteLog to record all received audio to disk. It does not stop until your disk is full, so you have to watch your disk space (I will either write the audio to a CD ROM or delete the wave files before the next ham radio contest). WriteLog automatically turns this selection off if it fails to be able to write output (that is, if your disk is full). This setting is saved when you do a Setup|Save Configuration, so if you want WriteLog to automatically start recording every time WriteLog is started, then check this menu item and do a Setup|Save Configuration. I turn this option on about five minutes before the contest starts.
Sound Card Type
For choosing your sound card type, click on 'Setup', then 'Sound'. You'll be presented with the following dialog boxes:

Again, from the drop-down menu, select your sound card. Since I have a RIGblaster, that is what is selected.
If you have two radios, you need to have a sound card for each - click on 'Switch to separate device per radio' to do so.
The second piece WriteLog needs to know about is the location of your WAV files with your digital recordings. To access that, click on the 'TX Wave File Location' button in the middle dialog box above.
Clicking on that button will open up Windows Explorer where you select the folder with your WAV files in them.

Side Note: WAV files are the voice recordings you make for the contest. For example, you can record your callsign and assign it to one of the message function keys, similar to the CW messages. For example, I can record K9JY.wav, store it in the above folder, and then have that message be associated with F5. In a phone contest, pressing F5 will then play K9JY.wav - say, Kilowatt Nine Japan Yankee.
Note two items: first, a wav file MUST already be in the sub-directory. Notice on the top of the tool bar where it asks 'Choose any WAV file in the directory.' Without a wav file in the directory, you can't click on one! Click on a wav file and then click on Open.
Second, you can have Operator folders here and save the wav files for that operator to them (e.g., K9JY wav files go to the K9JY Folder). These are used in a multi-operator environment. If you are in a multi-environment, you can designate yourself as the operator and your wav files will be found as a sub-directory here.
CW Speeds
If you CW contest, WriteLog will send CW for you utilizing function keys. The speed that WriteLog sends the CW is established here. Obviously, if you don't CW contest, you don't need to worry about this.
This table establishes the CW speeds sent by WriteLog. Clicking on 'WriteLog Options’, ‘Ports’ and the 'CW Speeds' button produces the following dialog box:

These are the speeds stored in my program. Once acceptable, click on 'OK.' When in the WriteLog program and contesting, the CW speeds are incremented and decremented by Alt-F9 and Alt-F10 on your PC. The increment the CW speed changes to is determined from your entries in this CW Speeds box.
The default speed that WriteLog uses upon opening the program for a CW contest whatever is in the lower left corner, in this case the value is '22' WPM.
Great Circle Setting
WriteLog needs to know where you are so it can give you beam headings for your antenna(s). You set this in the dialog box by clicking on 'Setup'| 'Great Circle...'

Terrific, right? All you need to know is your Lat/Longitude and you're all set. Not many of us know that off the top of our heads. Fortunately, I already went down this rabbit hole and here's how you go about it using Google Maps.
Finding and Converting Latitude and Longitude
Once you have those numbers, you can plug them into the above dialog box.
Since I wrote that article, it's even easier - using the web version of Google Maps, put in your address and then right click on the pin and the first entry for you is your Latitude and Longitude!
NOTE: you must be in Google Maps, not just the normal Google Search.