Tools
The Tools menu gives the ham radio contest operator great flexibility for using the software program and computer hardware to help make ham radio contesting easier. The Tools section looks at:
Recover Window Layout
Once you've done a contest, you will have finally settled on a layout for the windows used by WriteLog (like the layout on the Home page, for example). The next year you operate that contest, rather than remembering or rebuilding the window layout all over again, you can use this option to select the contest from the last time you operated in it and WriteLog will magically produce the same window layout used last time. And you don't have to wait a year for the same contest - just pick the window layout from the last contest you worked and adjust from there. A big time saver.
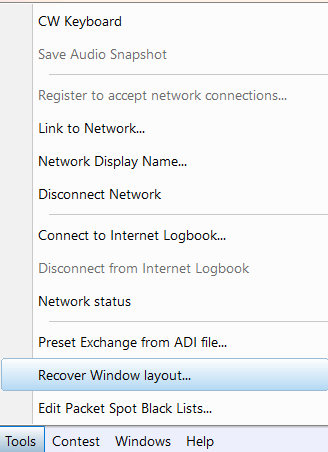
Then once selected, a Windows Explorer window will open. Navigate to where your contest files are stored, select the contest you want, and the windows will be restored.
Preset Exchange From ADI File
WriteLog allows you to use a previous ham radio contest log to load in previously worked calls and exchanges in the current contest. For example, loading in a previous Sweepstakes ham radio contest will cause all of the calls you worked and their exchanges to default into the Log Window when worked. Your Check Call Partial window will also show the calls from the previous log to show up front in the list as the feature assumes that they are likely to be in this contest as well.
In the tools menu, selecting this option will provide you a standard Windows Explorer dialog box. Navigate to the ADI file, select it, and you're done.
Note: You must export a standard WriteLog file (a .wl extension) to an ADI file (an .adi extension).

Networking WriteLog
Setting up the Contest Log
This is used for multi-type stations. Single Ops with a single radio are not impacted by this.
While WriteLog is somewhat tolerant of not having matching contest files, I wouldn’t go there. It is much better to create your contest log on one computer and then copy the file (renaming the file to a unique name on each computer…for example CQWW40 for the 40-meter station computer) to each of the computers in the network.
For example, something simple as having a contest file casually opened and saved on each computer but not going through each of the specialized setup steps as exactly the same on each file could leave one computer with doing serial numbers counted on all bands — but the contest rules require it separated by band. You just lost your contest entry. There are lots of examples that could trap you if you don’t pay attention to this step.
The way around this possible disaster is to create a “master” log file that is saved with no contacts, but with all of the contest parameters setup exactly as you want the set up to be for your operation. And, when networking computers, go through the step one “Register to Accept Network Connections” below and then stop when setting up the master file.
Save the master file with some easily recognized name (for example in the CQ WW Contest: CQWWMaster…). Never use this file during the contest, but simply have it easily accessible on a hard or USB drive so that the contest file could be recopied to any computer if needed.
Then, save and rename the master file on each computer with a unique name for each PC (CQWWRun, CQWWMult, etc.) and use that file on the computer during the contest. The unique naming is especially useful for merging files later if needed.
Connecting the Computers
Networking is used to connect multiple computers together to share information. Most often, this is done in a Multi-Op contesting environment. However, RTTY SO2R contesters will also connect two radios to two different PC’s and network the PC’s together instead of connecting two radios to one PC. If you’re only using one PC with two radios, just skip this step.
There is a three-step process to establish networking:
First, Register to Accept Network Connections.

Clicking will produce the following dialog box where WriteLog retrieves the networking information from your PC:
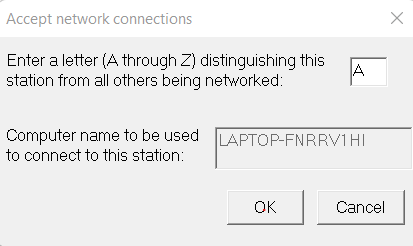
In our example, ‘Laptop-FNRRV1HI’ is the Windows network name for the PC and will show as a default. You need to put in, one time, the letter designation for the station; in this case ‘A.’ Click on OK.
Note: One PC simply needs to register to accept connections and do nothing else. All the other PC’s in the network will connect to it.
So, in a two PC network, PC ‘A’ will now be done with the networking setup. All other PC’s will continue on with the next two steps.
Second, Link to the Network. Once you have registered to accept connections, the other PC’s in the network will show additional options available in the Setup selections as shown below:

Note that ‘Link to the Network,’ ‘Network Display Name,’ and ‘Disconnect Network’ now become available.
Click on ‘Link to Network,’ which produces the following dialog box:
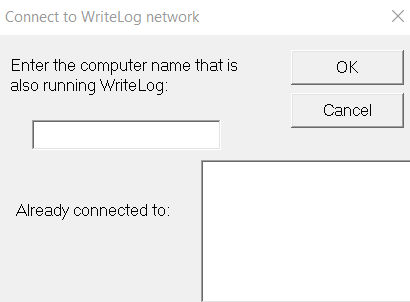
Type in the name of computer that you want to connect to (WriteLog will remember it if you do this again) and click OK. In our example, if we were on computer B wanting to connect to computer A (Laptop-FNRRV1HI above), you would type in ‘Laptop-FNRRV1HI’ as the computer name that is also running WriteLog. If you are already connected, WriteLog will show the name in the ‘Already connected to’ box.
Third, type in a ‘Network Display Name.’ This is the name that will be shown on the Networking Frequencies window. There are five available characters to input a name. I’d make it something that makes sense to everyone on the team like ’40M’ for forty meters or ‘2ND’ for the second radio in an SO2R setup. The dialog box looks like this:
